You just installed a plugin to test a feature, and now you’re done with it. Should you deactivate it or delete it completely? The wrong choice could leave behind database clutter, create security risks, or even break your site if you’re not careful.
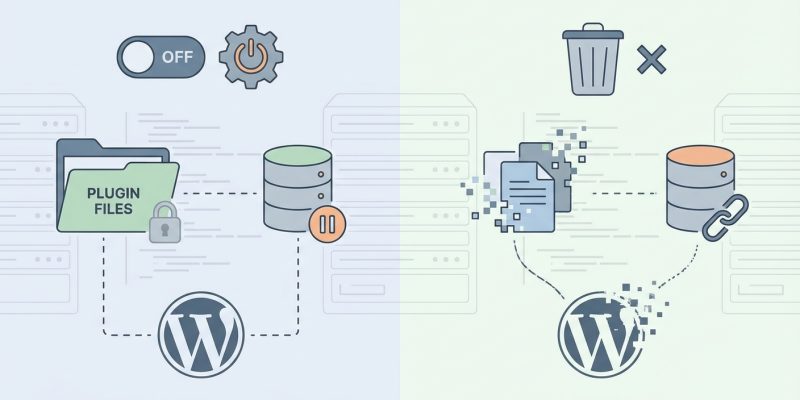
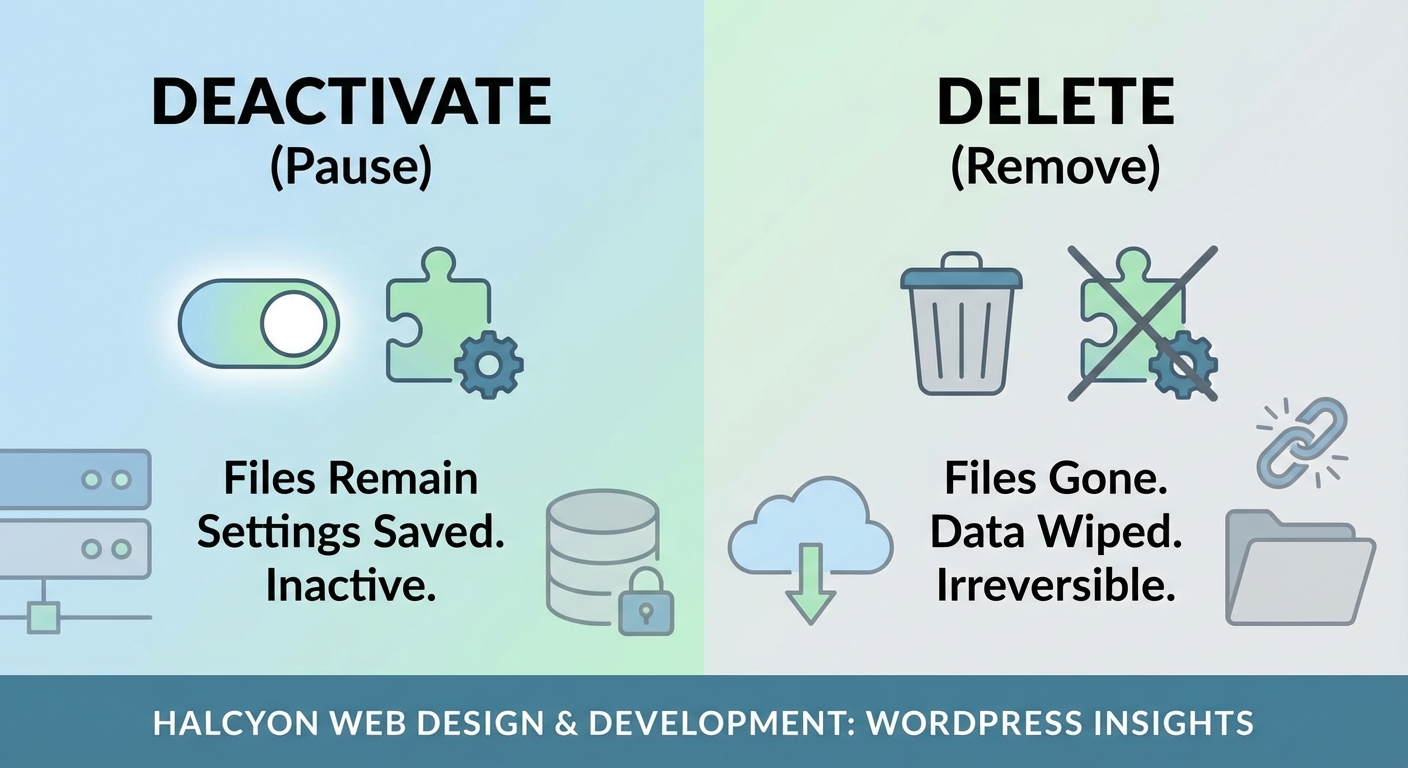
Deactivating a plugin turns it off but keeps all files and settings intact, making it easy to reactivate later. Deleting a plugin removes all files from your server and usually erases settings and data, freeing up space and reducing security risks. Choose deactivation for temporary pauses and deletion for permanent removal after backing up your site.
Understanding what deactivation actually does
When you deactivate a plugin, WordPress stops running its code. The plugin files stay on your server, and all settings remain stored in your database. Nothing gets removed.
Your site won’t use any of the plugin’s features. Shortcodes from that plugin might show up as plain text. Widgets will disappear from your sidebars. Custom post types may become inaccessible in your admin panel.
But the data is still there. You can reactivate the plugin anytime, and everything comes back exactly as you left it.
This makes deactivation perfect for troubleshooting. If your site breaks after an update, you can deactivate plugins one by one to find the culprit. Once you identify the problem, you can reactivate the others without losing any configurations.
When to deactivate instead of delete:
- You’re testing if a plugin causes a conflict
- You might need the plugin again in a few weeks or months
- You want to preserve all settings and data
- You’re trying different plugins for the same feature and want to compare them
- You’re troubleshooting a site error and need to isolate the cause
What really happens when you delete a plugin
Deletion goes much further. WordPress removes all plugin files from your server’s /wp-content/plugins/ directory. The plugin disappears from your installed plugins list.
Most well-coded plugins also clean up after themselves. They delete custom database tables, remove options from the wp_options table, and erase any stored settings.
But not every plugin does this properly. Some leave orphaned data behind, cluttering your database with entries you’ll never use again. Others might remove too much, deleting content you wanted to keep.
For example, a page builder plugin might delete all pages created with it. A form plugin could erase submission records. An SEO plugin might remove all your meta descriptions.
Before you delete any plugin, check its documentation. Look for information about what data gets removed and whether you need to export anything first.
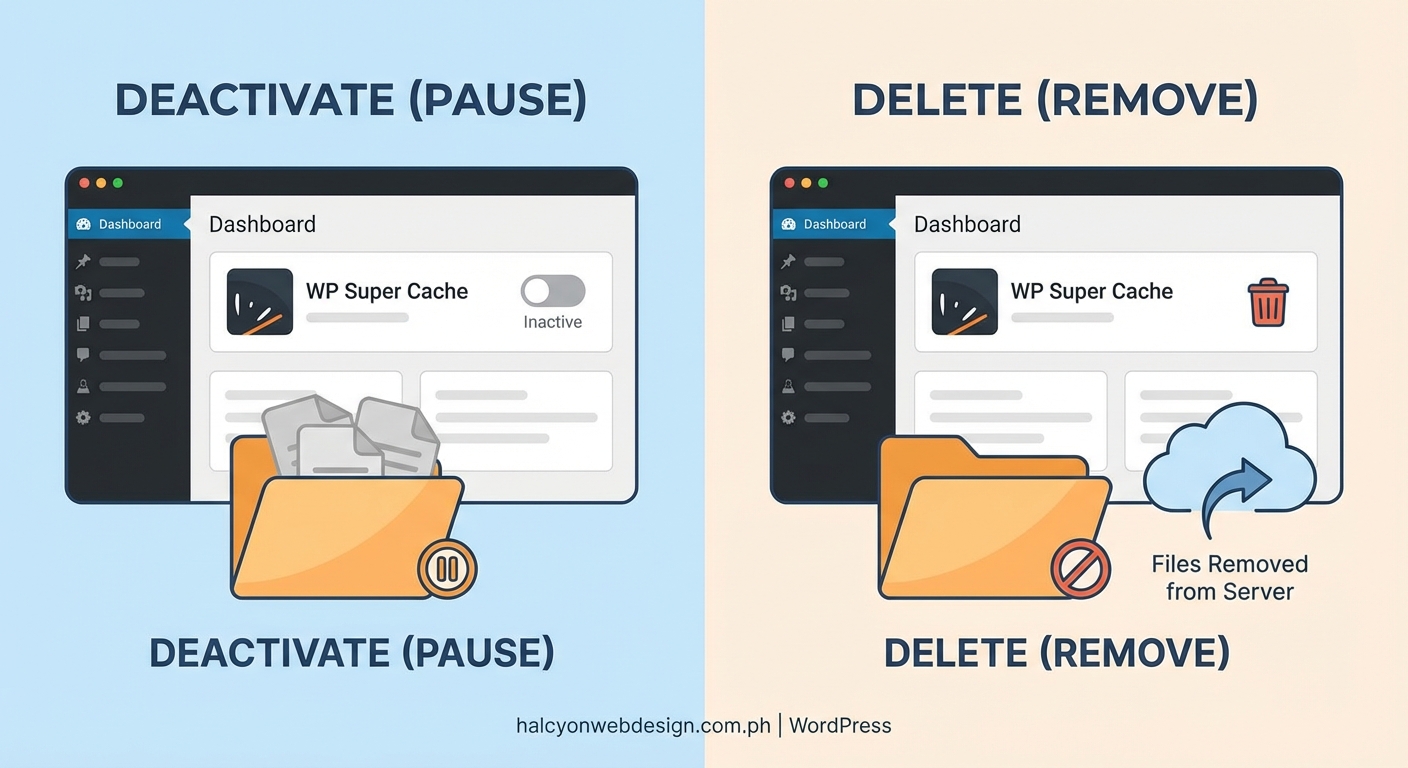
Step by step guide to deactivate a plugin safely
Deactivating a plugin takes just a few clicks, but doing it properly matters.
- Log into your WordPress dashboard with an administrator account.
- Navigate to Plugins in the left sidebar and click Installed Plugins.
- Find the plugin you want to deactivate in the list.
- Click the Deactivate link directly under the plugin name.
- Wait for the page to reload and confirm the plugin shows as inactive.
If you manage choosing the right WordPress plugin carefully from the start, you’ll have fewer plugins to deactivate later.
For sites with many plugins, you can deactivate several at once. Check the box next to each plugin name, select Deactivate from the bulk actions dropdown at the top, then click Apply.
Always keep at least one backup plugin active, or use your hosting provider’s backup system. Never deactivate all your security plugins at once, even for testing.
Step by step guide to delete a plugin permanently
Deleting requires an extra step because WordPress wants to make sure you really mean it.
- Log into your WordPress dashboard as an administrator.
- Go to Plugins and then Installed Plugins.
- Make sure the plugin is deactivated first (you cannot delete an active plugin).
- Click the Delete link under the plugin name.
- Confirm the deletion in the popup warning that appears.
- Wait for WordPress to remove all files and show a success message.
Some plugins add a settings page that lets you choose whether to keep or remove data during deletion. If you see this option, decide carefully. Once you confirm full data removal, you cannot get it back without a backup.
Comparing the two approaches side by side
Different situations call for different actions. This table breaks down the key differences.
| Factor | Deactivate | Delete |
|---|---|---|
| Plugin files | Remain on server | Completely removed |
| Settings and data | Fully preserved | Usually erased |
| Database entries | Stay intact | Often cleaned up |
| Server space used | Still occupies storage | Frees up space |
| Security risk | Files could be exploited | Risk eliminated |
| Reactivation speed | Instant | Requires reinstallation |
| Best for | Temporary pause | Permanent removal |
Why keeping inactive plugins creates real problems
Inactive plugins aren’t harmless. They still exist as files on your server, and those files can be targeted by attackers.
Security vulnerabilities don’t care if a plugin is active. If an old version of a deactivated plugin has a known exploit, hackers can still use it to access your site. They can upload malicious files, steal data, or take over your entire WordPress installation.
Inactive plugins also make maintenance harder. When you update WordPress core, you need to check compatibility with all your plugins, not just active ones. If you forget about a deactivated plugin and it conflicts with a core update, your site could break.
Database clutter builds up over time too. Each plugin adds tables and options. Even after deactivation, those entries remain, slowing down database queries and making backups larger than necessary.
If your WordPress site loads slowly, inactive plugins might be part of the problem through database bloat.
Common mistakes that cause data loss
People make predictable errors when managing plugins. Avoiding these saves you from scrambling to restore backups.
Deleting without deactivating first: You cannot delete an active plugin through the WordPress interface, but some file managers let you remove active plugin folders directly. This breaks your site instantly.
Skipping backups before deletion: Always create a full backup before deleting any plugin, especially ones that manage content, users, or custom post types. If something goes wrong, you can restore everything.
Ignoring plugin-specific export tools: Many plugins offer export features for their data. Contact form plugins let you download submissions. SEO plugins let you export settings. Use these tools before deletion.
Deleting plugins that other plugins depend on: Some plugins extend other plugins. If you delete the parent plugin, the extensions break. Check dependencies before removal.
Removing plugins during high traffic: If your site gets busy during certain hours, schedule plugin deletion for low-traffic periods. This minimizes the impact if something goes wrong.
How to clean up after poorly coded plugins
Not every plugin developer follows best practices. Some plugins leave a mess behind even after deletion.
You can identify orphaned data by checking your database directly through phpMyAdmin or a similar tool. Look for tables with prefixes matching the deleted plugin’s name. Check the wp_options table for entries related to the plugin.
Before manually deleting anything from your database, create a complete backup. One wrong deletion can corrupt your entire site.
Database cleanup plugins can help automate this process. They scan for orphaned tables and unused options, letting you remove them safely. But research any cleanup plugin carefully before installation, as a poorly designed one can cause more problems than it solves.
Making the right choice for your specific situation
Think about your actual needs before clicking any buttons.
Choose deactivation when you’re testing, troubleshooting, or might need the plugin again. The small amount of server space it uses rarely matters compared to the convenience of keeping your settings.
Choose deletion when you’re certain you’ll never use the plugin again, when it has known security issues, or when you’re actively trying to reduce your site’s footprint. Just make sure you have backups and understand what data will be lost.
For plugins you use seasonally (like holiday-specific features), deactivation makes more sense than repeated installation and deletion cycles.
For plugins you tried once and hated, deletion clears them out completely and reduces your security surface area.
Creating a plugin management routine
Regular maintenance prevents plugin chaos from building up over time.
Set a calendar reminder every three months to review your installed plugins. Ask yourself these questions about each one:
- Have I used this plugin in the past 90 days?
- Does this plugin still receive regular updates from its developer?
- Could I accomplish the same thing with less code or a different approach?
- Am I keeping this plugin “just in case” without a specific plan to use it?
Be honest with yourself. That plugin you installed 18 months ago “for future use” probably isn’t getting used. Delete it.
Keep a simple spreadsheet listing every plugin on your site, what it does, and when you last reviewed it. This takes five minutes per quarter but saves hours of confusion later.
Security considerations you cannot ignore
Every plugin adds code to your site. More code means more potential vulnerabilities.
Plugin developers abandon projects. When a plugin stops receiving updates, it becomes a security liability. Even if it works fine today, tomorrow’s WordPress update or PHP version change could expose a weakness.
Check the last update date for every plugin on your site. If something hasn’t been updated in over a year, start looking for alternatives. If it’s been more than two years, delete it immediately unless you have a very specific reason to keep it.
Some hosting providers offer security scanning that flags outdated plugins. Take these warnings seriously. The convenience of keeping an old plugin isn’t worth the risk of a compromised site.
Securing your WordPress login page matters, but plugin security is equally important.
Testing before you commit to deletion
Before you delete any plugin permanently, run through this testing checklist.
First, create a complete backup of your site. Use your hosting provider’s backup tool, a backup plugin, or manual file and database downloads. Verify the backup actually worked by checking file sizes and dates.
Second, deactivate the plugin and browse your site. Check every page type: your homepage, blog posts, pages, archives, and any custom post types. Look for broken layouts, missing content, or error messages.
Third, test your site’s core functionality. Try submitting a contact form, making a test purchase if you run a store, or creating a new post. Make sure nothing breaks.
Fourth, check your database for orphaned content. If the plugin created custom post types, those posts might become inaccessible but not deleted. Decide whether you need to export that content first.
Only after all these checks should you proceed with deletion.
What to do when deletion goes wrong
Sometimes you delete a plugin and immediately regret it. Your site breaks, content disappears, or features stop working.
Stay calm. If you made a backup before deletion, you can restore it. Most hosting providers offer one-click restore options that bring back your entire site in minutes.
If you didn’t make a backup, check if your host keeps automatic backups. Many do, usually going back 7 to 30 days. Contact their support team for help restoring from these backups.
If no backups exist, you can reinstall the plugin immediately. It won’t restore your previous settings or data, but it might prevent further damage. Then you can rebuild your configuration manually.
This is why backing up before plugin deletion isn’t optional. It’s the safety net that lets you experiment without fear.
Managing plugins on multiple WordPress sites
If you maintain several WordPress installations, plugin management becomes more complex but also more important.
Create a standard plugin list for similar sites. If you run five business websites, they probably all need the same core plugins for security, backups, and SEO. Install and configure these consistently across all sites.
Document your plugin choices and settings. When you need to replicate a setup or troubleshoot an issue, having notes saves enormous time.
Consider using a WordPress management tool if you handle more than a handful of sites. These tools let you update, activate, and deactivate plugins across multiple installations from one dashboard.
But don’t fall into the trap of installing the same plugins everywhere just because you can. Each site has unique needs. A photography portfolio doesn’t need the same plugins as an online store.
Planning your plugin strategy from the start
The best way to avoid plugin confusion is to be intentional from the beginning.
Before installing any plugin, write down exactly what problem it solves. If you can’t articulate a specific need, you probably don’t need the plugin.
Research alternatives. Many plugins do similar things with different approaches. One might be actively maintained while another hasn’t been updated in years. One might be lightweight while another adds dozens of database queries.
Read recent reviews and check the support forum. If other users report problems, conflicts, or abandoned support tickets, look elsewhere.
Install one plugin at a time and test your site after each installation. This makes it easy to identify which plugin causes problems if something breaks.
When choosing the right WordPress hosting plan, consider how many plugins you’ll need and whether your hosting resources can support them.
Understanding the database impact
Plugins interact with your WordPress database in different ways, and these interactions don’t always stop when you deactivate them.
Some plugins create entirely new database tables. A membership plugin might add tables for user levels, subscription data, and payment history. An events plugin might create tables for venues, schedules, and registrations.
Other plugins just add options to existing tables. They store settings, cache data, or temporary information in the standard WordPress tables.
When you deactivate a plugin, all this database content remains. The tables stay in place. The options keep taking up space. Your database doesn’t automatically clean itself.
When you delete a well-coded plugin, it should remove its custom tables and options. But many plugins skip this step, either by design (to preserve data in case you reinstall) or through poor coding.
You can check your database size through your hosting control panel or phpMyAdmin. If you notice it growing without explanation, orphaned plugin data might be the cause.
The role of plugin dependencies
WordPress plugins can depend on other plugins, and these relationships affect how you manage them.
Some plugins explicitly require others. WooCommerce extensions need WooCommerce. Page builder add-ons need their parent page builder. These dependencies are usually clearly stated in the plugin description.
Other dependencies are less obvious. A caching plugin might work best with a specific image optimization plugin. A security plugin might conflict with certain backup plugins.
Before deactivating or deleting any plugin, check whether other active plugins depend on it. Look through your plugin list for names that suggest a relationship. Read documentation for your major plugins to understand their ecosystem.
If you delete a parent plugin, child plugins will break. They’ll throw errors, fail to load, or cause blank screens. Always remove child plugins before removing parents.
Keeping your site clean and efficient
A lean WordPress installation runs faster, updates easier, and has fewer security vulnerabilities.
Aim to minimize your plugin count without sacrificing functionality. If two plugins do similar things, pick the better one and delete the other. If a plugin only provides one small feature you rarely use, consider whether you really need it.
Some functionality doesn’t require plugins at all. Simple customizations can be added to your theme’s functions file. Basic styling changes belong in your CSS. Not everything needs a plugin.
But don’t take minimalism too far. If a plugin solves a real problem well and receives regular updates, keep it. The goal isn’t to have the fewest plugins possible, it’s to have exactly the plugins you need and nothing more.
Review your plugin list whenever you update WordPress core. This natural checkpoint reminds you to assess what you’re actually using.
Making plugin decisions with confidence
You now understand the real differences between deactivating and deleting WordPress plugins. Deactivation pauses functionality while preserving everything. Deletion removes files and usually erases data.
Neither choice is universally better. The right option depends on your specific situation, your future plans, and whether you’ve backed up your site.
Make it a habit to review your plugins regularly, delete what you don’t need, and keep detailed notes about what each plugin does. Your future self will thank you when you’re not trying to remember why you installed something 14 months ago.
Start today by opening your plugins page and identifying just one plugin you can safely delete. Create a backup, test your site after deactivation, then remove it permanently. You’ve just made your site a little faster, a little more secure, and a lot easier to maintain.