
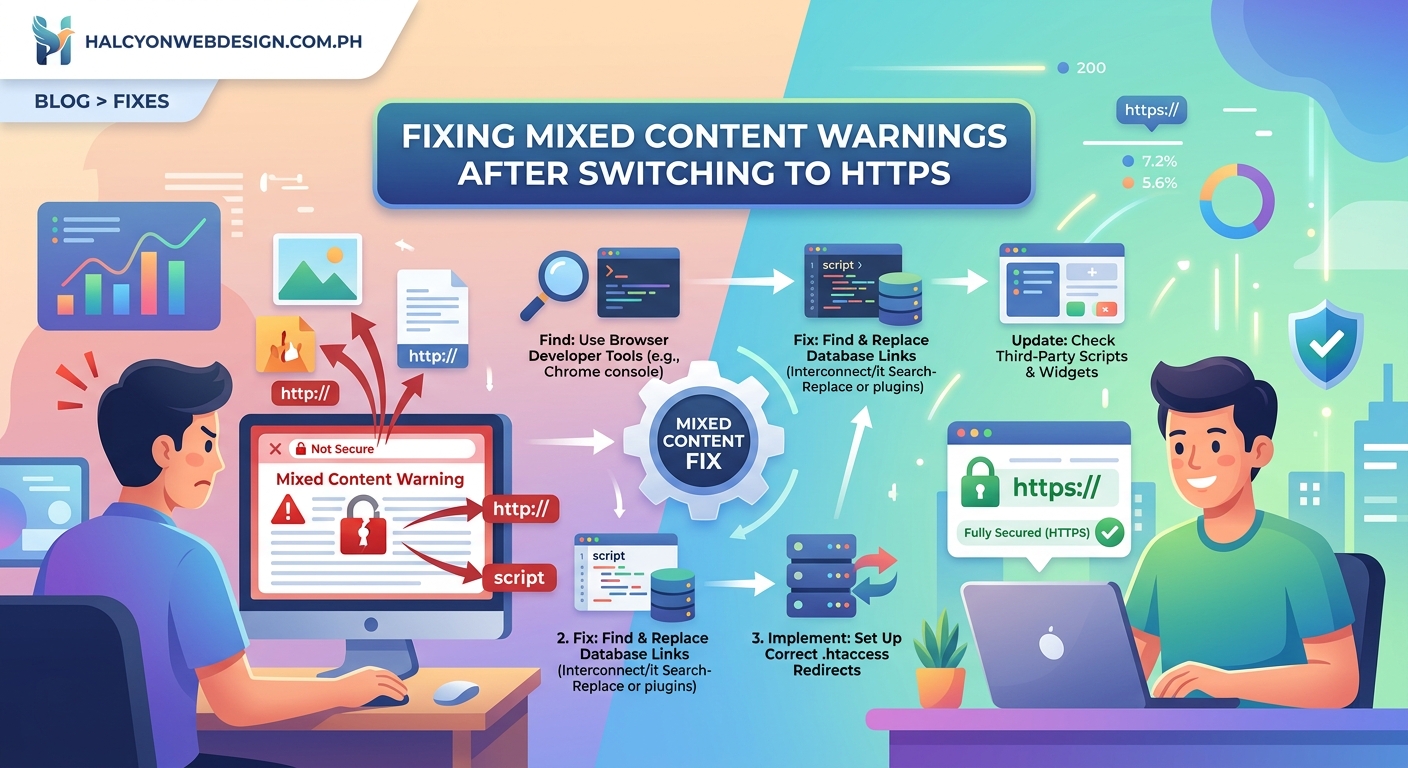
You just moved your site to HTTPS. Everything should be secure now, right? But instead of that reassuring padlock in the browser bar, you’re seeing warnings about mixed content. Some images won’t load. Your browser console is full of red error messages. Visitors might be getting security alerts.
This happens because your site is loading some resources over HTTP while the page itself uses HTTPS. Browsers block these insecure resources to protect users, but that breaks your layout and functionality.
Mixed content warnings appear when HTTPS pages load resources over HTTP. To fix mixed content warnings https migration creates, you need to identify all insecure resources, update URLs to HTTPS, implement redirects, and verify your SSL configuration. Most sites can resolve these errors in under an hour using browser tools, database search-and-replace, and proper server settings.
Why Mixed Content Happens After HTTPS Migration
When you switch to HTTPS, your server starts delivering pages over a secure connection. But if your HTML still contains hardcoded HTTP URLs, browsers treat those as security risks.
Modern browsers distinguish between two types of mixed content.
Passive mixed content includes images, audio, and video. Browsers usually load these with a warning but don’t block them entirely. Your padlock icon disappears or shows as broken.
Active mixed content includes scripts, stylesheets, iframes, and fonts. Browsers block these completely because they could modify page behavior. This breaks functionality.
The problem gets worse if you migrated from HTTP to HTTPS without updating your database. WordPress stores full URLs in post content, widget settings, theme options, and plugin configurations. Every HTTP reference needs updating.
External resources cause trouble too. Third-party scripts, embedded videos, social media widgets, and CDN files must load over HTTPS. If a service doesn’t support HTTPS, you need alternatives.
How to Identify All Mixed Content Sources
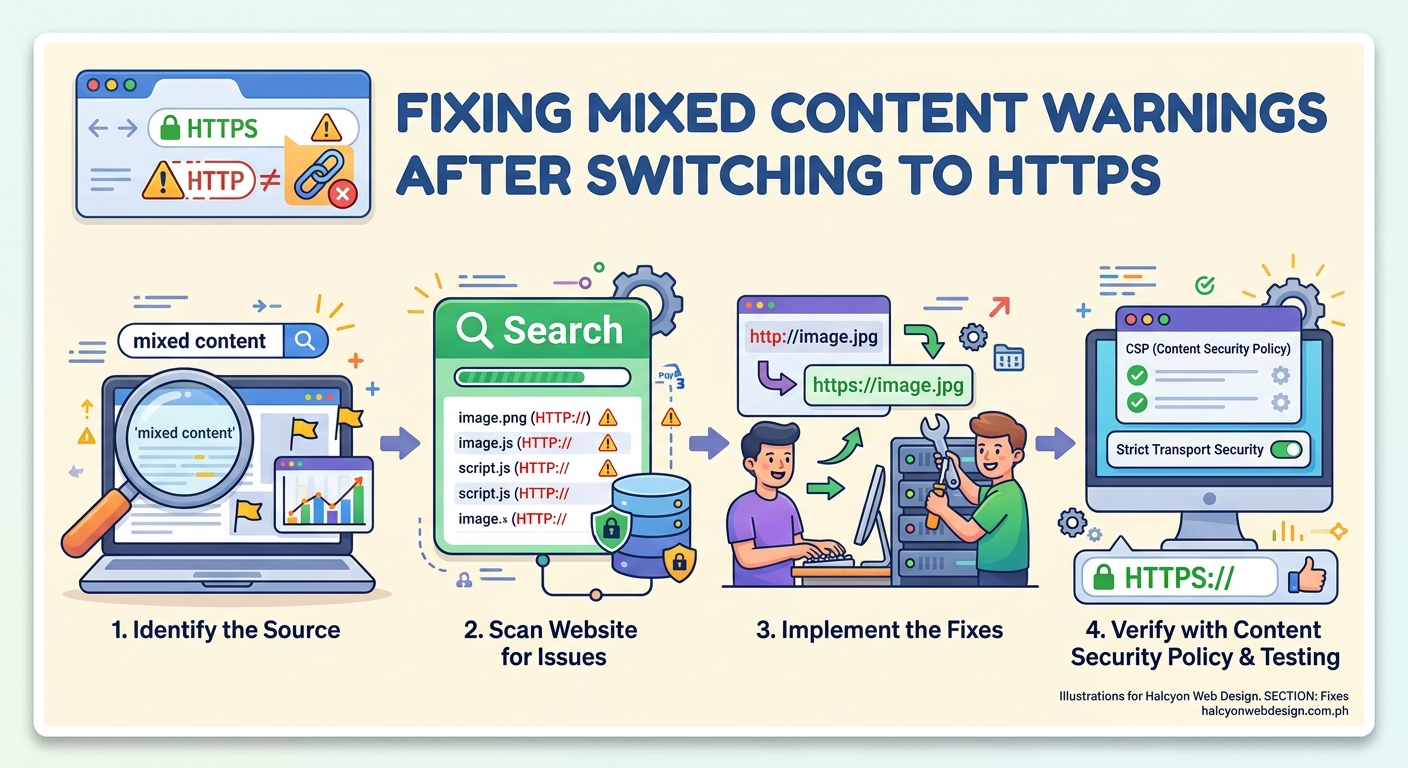
Before you can fix anything, you need to see exactly what’s loading insecurely.
Open your site in Chrome or Firefox. Right-click anywhere and select “Inspect” to open Developer Tools. Click the “Console” tab.
Reload the page. Mixed content warnings appear in red or yellow, showing the exact URL of each insecure resource.
Chrome displays messages like “Mixed Content: The page at ‘https://yoursite.com’ was loaded over HTTPS, but requested an insecure image ‘http://yoursite.com/image.jpg’.”
Firefox shows similar warnings with clickable links to each problem resource.
Make a list of every HTTP URL. Note whether each is an image, script, stylesheet, or other resource type. This tells you where to look for fixes.
The browser’s Network tab provides another view. Filter by “All” and look for resources with HTTP in the Protocol column. This catches resources that load without triggering console warnings.
For a complete site audit, use an online scanner. Why SSL Labs and JitBit SSL Checker crawl multiple pages and report all mixed content.
Step-by-Step Process to Fix Mixed Content Warnings HTTPS Creates
Now that you know what’s broken, here’s how to fix it systematically.
1. Update Internal URLs in Your Database
WordPress stores full URLs throughout the database. A search-and-replace fixes most internal mixed content.
Back up your database first. Use your hosting control panel or a plugin like how to choose the right WordPress backup plugin for your site recommends.
Install the Better Search Replace plugin from the WordPress repository. It’s safer than direct database editing because it handles serialized data correctly.
Go to Tools > Better Search Replace. In the “Search for” field, enter http://yoursite.com. In the “Replace with” field, enter https://yoursite.com.
Select all database tables. Check “Run as dry run” to preview changes without applying them. Click “Run Search/Replace.”
Review the results. If everything looks correct, uncheck “Run as dry run” and run it again to apply changes.
This updates URLs in post content, custom fields, widget settings, and most plugin data.
2. Fix Hardcoded URLs in Theme Files
Some themes hardcoded HTTP URLs in template files. You need to update these manually.
Connect to your site via FTP or use your hosting file manager. Navigate to /wp-content/themes/your-theme/.
Search all PHP files for http://yoursite.com. Most code editors have a “Find in Files” feature.
Replace hardcoded HTTP URLs with HTTPS versions. Better yet, use relative URLs (starting with //) or WordPress functions like get_template_directory_uri() that automatically use the correct protocol.
Common places to check include header.php, footer.php, and functions.php.
If you’re using child themes explained when you need one and how to create it safely, only edit the child theme files.
3. Update Plugin Settings and Shortcodes
Many plugins store URLs in their own settings pages. You need to update these individually.
Check any plugin that handles media, embeds, or external services. Slider plugins, gallery plugins, and social media widgets often store full URLs.
Look for shortcodes in your posts that embed external content. If a shortcode includes an HTTP URL, edit the post and update it to HTTPS.
Contact form plugins sometimes reference external scripts or validation services. Check their settings for HTTP references.
4. Force HTTPS at the Server Level
After updating URLs, configure your server to force HTTPS connections.
Add this code to your .htaccess file (for Apache servers):
RewriteEngine On
RewriteCond %{HTTPS} off
RewriteRule ^(.*)$ https://%{HTTP_HOST}%{REQUEST_URI} [L,R=301]
This redirects all HTTP requests to HTTPS automatically. Place it at the top of your .htaccess file, before WordPress rules.
For Nginx servers, add this to your server block:
if ($scheme = http) {
    return 301 https://$server_name$request_uri;
}
Some hosting providers offer HTTPS forcing in their control panel. Check your hosting documentation.
5. Update WordPress Address Settings
WordPress stores site URLs in two database fields. Make sure both use HTTPS.
Go to Settings > General in your WordPress admin. Check the “WordPress Address (URL)” and “Site Address (URL)” fields.
Both should start with https://. If they still show http://, update them and save.
If you can’t access your admin panel, update these directly in the database. In the wp_options table, find the siteurl and home rows and change their values to your HTTPS URL.
6. Fix External Resources
External resources need special attention because you don’t control them.
For CDN resources, most CDNs support HTTPS. Update your URLs from http://cdn.example.com to https://cdn.example.com.
For embedded content like YouTube videos, use protocol-relative URLs. Change http://www.youtube.com/embed/VIDEO_ID to //www.youtube.com/embed/VIDEO_ID. The browser automatically uses HTTPS if the page is secure.
If an external service doesn’t support HTTPS, find an alternative. Hosting insecure resources on your own server isn’t ideal, but it’s better than mixed content warnings.
Social media widgets sometimes load over HTTP. Check the embed code from Facebook, Twitter, or Instagram. Most now provide HTTPS versions by default.
Common Mixed Content Sources and Their Solutions
Different types of resources require different fixes. Here’s a breakdown of the most common culprits.
| Resource Type | Common Location | Fix Method |
|---|---|---|
| Images in posts | Database content | Search-and-replace in database |
| Theme images | Template files | Update theme PHP files or use relative URLs |
| External scripts | Plugin settings | Update plugin configuration |
| Stylesheets | Theme or plugin | Update enqueue functions to use HTTPS |
| Iframes | Post content or widgets | Edit posts/widgets to use HTTPS embed codes |
| Fonts | CSS files | Update @font-face URLs to HTTPS or use relative paths |
| Background images | CSS files | Update background-image URLs in stylesheets |
Images cause the most mixed content warnings because they appear throughout your content. The database search-and-replace handles most of these.
Scripts and stylesheets usually come from your theme or plugins. Check your theme’s functions.php for wp_enqueue_script() and wp_enqueue_style() calls. Make sure the URLs use HTTPS or relative paths.
Iframes from external services need updating in your post content. Search your posts for <iframe tags and update the src attributes to HTTPS.
Verifying Your HTTPS Configuration Is Complete
After making changes, verify everything works correctly.
Clear your browser cache completely. Mixed content warnings sometimes persist in cached pages.
Visit your homepage and several internal pages. Check the browser address bar for the padlock icon. Click it to verify the connection is secure.
Open Developer Tools and check the Console tab. No mixed content warnings should appear.
Test your site in multiple browsers. Chrome, Firefox, Safari, and Edge handle mixed content slightly differently.
Use an online SSL checker to scan your entire site. SSL Labs Server Test provides a comprehensive security report.
Check your site on mobile devices. Sometimes mobile themes or plugins load different resources.
If you’re still seeing warnings, repeat the identification process. Some resources only load on specific pages or under certain conditions.
Preventing Future Mixed Content Issues
Once you’ve cleaned up existing problems, prevent new ones from appearing.
Install a plugin that enforces HTTPS for all resources. Really Simple SSL automatically converts HTTP URLs to HTTPS as pages load. This catches resources you might miss.
Configure your CDN to serve all files over HTTPS. Most CDNs like Cloudflare or Cloudinary support HTTPS by default, but you need to enable it in settings.
When adding new content, always use HTTPS URLs. Better yet, use relative URLs that work with any protocol.
Set up Content Security Policy headers to block mixed content entirely. Add this to your .htaccess:
Header always set Content-Security-Policy "upgrade-insecure-requests;"
This tells browsers to automatically upgrade HTTP requests to HTTPS. It’s a safety net that catches resources you might miss.
Monitor your site regularly. Set up understanding core web vitals a webmasters guide to page experience metrics to catch security issues early.
When choosing new plugins or themes, verify they support HTTPS properly. Check reviews and documentation before installing.
“Mixed content is one of the most common issues after HTTPS migration, but it’s also one of the easiest to fix systematically. The key is being thorough. One missed HTTP URL can break your security badge and hurt user trust.”
Troubleshooting Persistent Mixed Content Warnings
Sometimes mixed content persists even after you’ve updated everything. Here’s how to handle stubborn cases.
Cached resources cause false warnings. Clear your browser cache, server cache, and CDN cache. Some hosting providers cache aggressively. You might need to purge cache from your hosting control panel.
Plugins regenerate HTTP URLs. Some poorly coded plugins recreate HTTP URLs even after you update them. Deactivate plugins one by one to identify the culprit. Contact the developer for an update or find an alternative.
Theme options store HTTP URLs. Check your theme customizer settings. Some themes store logo URLs, background images, or custom CSS with hardcoded HTTP references. Update these in Appearance > Customize.
Database tables you missed. The search-and-replace might have skipped custom tables created by plugins. Use phpMyAdmin to search the entire database for http://yoursite.com. Update any remaining references manually.
External services don’t support HTTPS. If a third-party service only offers HTTP, you have three options. Find an alternative service that supports HTTPS. Host the resource on your own server. Remove the resource entirely if it’s not essential.
Redirect loops cause confusion. If your site redirects infinitely between HTTP and HTTPS, you have conflicting redirect rules. Check your .htaccess file for multiple redirect rules. Remove duplicates and keep only one HTTPS redirect at the top.
SSL certificate issues look like mixed content. If your SSL certificate isn’t properly installed, browsers show security warnings that resemble mixed content errors. Verify your certificate is valid and covers all your subdomains using 5 common SSL certificate errors and how to fix them fast.
How Mixed Content Affects Performance and SEO
Mixed content doesn’t just trigger warnings. It impacts your site’s performance and search rankings.
Browsers block active mixed content completely. If a blocked script controls your navigation menu or contact form, those features break. Users can’t interact with your site properly.
Google considers HTTPS a ranking signal. Sites with mixed content warnings don’t get full credit for HTTPS. You lose the SEO benefit you worked to achieve.
Page load times increase when browsers block resources. The browser attempts to load HTTP resources, fails, and displays errors. This adds latency to your page rendering.
User trust suffers when security warnings appear. Studies show users abandon sites that display “Not Secure” warnings. Your conversion rate drops even if everything functions correctly.
Core Web Vitals scores decrease when resources fail to load. Missing stylesheets cause layout shifts. Blocked scripts delay interactivity. These metrics directly affect search rankings through understanding core web vitals a webmasters guide to page experience metrics.
Tools That Make Mixed Content Detection Easier
Manual checking works for small sites, but larger sites need automated tools.
Browser Developer Tools remain the most reliable method. They show real-time loading and catch conditional resources that only appear under specific circumstances.
JitBit SSL Check scans your entire site and generates a report of all mixed content. It crawls internal links and tests multiple pages automatically.
Why No Padlock provides a detailed analysis of security issues. It identifies mixed content, SSL certificate problems, and other HTTPS issues in one report.
Really Simple SSL plugin includes a mixed content fixer that runs automatically. It scans your site and converts HTTP URLs to HTTPS on the fly. This doesn’t fix the source problem, but it prevents warnings while you work on permanent fixes.
SSL Labs Server Test evaluates your entire SSL configuration. It checks certificate validity, protocol support, and common security vulnerabilities beyond just mixed content.
Chrome’s Security Panel in Developer Tools shows why your connection isn’t secure. Click the “Not Secure” warning in the address bar, then “Certificate” to see detailed information.
Screaming Frog SEO Spider crawls your site and identifies HTTP resources. Configure it to check for mixed content in the Configuration > Spider > Advanced settings.
When to Use Content Security Policy Headers
Content Security Policy (CSP) headers provide an extra layer of protection against mixed content.
CSP tells browsers which resources are safe to load. You can block all HTTP resources automatically or upgrade them to HTTPS.
The upgrade-insecure-requests directive is perfect for mixed content. Add it to your server configuration:
Header always set Content-Security-Policy "upgrade-insecure-requests;"
This automatically converts HTTP requests to HTTPS. If a resource isn’t available over HTTPS, the browser blocks it.
Use CSP headers after you’ve fixed existing mixed content. They prevent new problems but don’t retroactively fix broken URLs.
CSP can break functionality if not configured correctly. Test thoroughly in a staging environment before deploying to production. Learn more about should you use a staging environment for your website.
Report-only mode lets you test CSP without blocking resources. Use this header to see what would be blocked:
Header always set Content-Security-Policy-Report-Only "upgrade-insecure-requests;"
Review the reports in your browser console. Once you’re confident everything works, switch to enforcement mode.
Keeping Your Site Secure After Fixing Mixed Content
Mixed content is just one aspect of HTTPS security. Maintain your security posture with these practices.
Renew your SSL certificate before it expires. Most certificates last one year. Set a calendar reminder for 30 days before expiration. Many hosts now offer automatic renewal through Let’s Encrypt.
Update WordPress, themes, and plugins regularly. Security patches often address HTTPS-related vulnerabilities. Check how to safely update WordPress plugins without breaking your site for a safe update process.
Monitor your site for new mixed content. Run monthly scans using SSL checkers. New plugins or content additions can reintroduce HTTP resources.
Implement HSTS headers to force HTTPS permanently. Add this to your server configuration:
Header always set Strict-Transport-Security "max-age=31536000; includeSubDomains"
HSTS tells browsers to always use HTTPS, even if a user types HTTP. This prevents downgrade attacks.
Configure proper redirects from HTTP to HTTPS. Use 301 permanent redirects, not 302 temporary ones. This preserves SEO value and tells search engines your move is permanent.
Check your sitemap uses HTTPS URLs. Submit an updated sitemap to Google Search Console. Learn the process at how to submit your sitemap to google search console step by step guide.
Update your robots.txt if it references HTTP URLs. Search engines need to crawl your HTTPS version properly.
Securing Every Resource on Your Site
Mixed content warnings disappear when every resource loads securely. The process takes time, but it’s straightforward.
Start with browser tools to identify problem resources. Update your database with search-and-replace. Fix hardcoded URLs in theme files. Configure server redirects to force HTTPS. Verify everything works across different browsers and devices.
The work pays off immediately. Your padlock icon returns. Security warnings vanish. Search engines recognize your site as fully secure. Users trust your site more when they see that reassuring HTTPS indicator.
Don’t wait for problems to compound. Each day with mixed content warnings damages user trust and search rankings. Set aside an hour this week to work through the checklist. Your site will be fully secure and warning-free before you know it.